Here’s how FX WRX made ‘Voyager’ using optical effects, animation, motion control robotics and projection techniques.
Are you a practical effects lover? Well, if you don’t already know the work of FX WRX, be sure to check out their website. The company specializes in in-camera practical effects solutions for films, TV idents, commercials and other projects.
One of FX WRX’s in-house projects, spearheaded by cinematographer and visual effects artist Christopher Webb, is Voyager. It’s an almost experiential-like piece that the team used to explore photographic animation techniques with a large-format animation camera, and motion control and optical effects, the kind pioneered by the likes of Douglas Trumbull.
Essentially, Voyager involved shooting a model on FX WRX’s mo-co set up and moving it one frame at time (and also moving it continuously to create motion blur during exposures) to produce an array of different optical light streaks and light effects.
befores & afters spoke to Webb about these ‘old-school’ techniques, and why he and his team are bringing practical back. Read on below for all the behind the scenes info, plus stills and video from the shoot.
b&a: Firstly, let’s talk about the sculpture or model itself. How did you make that?
Christopher Webb: I had worked at various model shops for almost 10 years, and we have a shop at FX WRX to build things like this. In the spirit of David Smith, the American sculptor, I tried to let the shapes speak for themselves. I made a bunch of pieces and laid them all out. It was like flower arranging. I’d just pick up pieces and see what felt right together. I was looking for something I thought Syd Mead would do. I like having a model to stare at and interact with. I pulled the whole thing apart several times and changed it.

I knew I wanted high contrast. I wanted very absorbent black with a little bit of a sheen for lighting, and I wanted semi-gloss white. And so I tried to put those pieces on in a rhythm and scale that meant they would respond to lighting. The model ended up being almost three feet long. It’s a plasticized foam core, so it’s quick to work with and not terribly heavy. It has its own lighting built in and a motor inside it so it can rotate about its own center point from within.
b&a: It also looks a little like a spaceship or a space station. I guess that was always in the back of your mind as well.
Christopher Webb: Oh, yeah. I thought, this has got a bit of a TRON vibe. It’s got a very reductive, minimalist vibe. I was thinking of the Star Trek: The Motion Picture space stations, and a thing from Battlestar Galactica called the Light Ship. I took every fun thing I like from movies and just reduced it. It’s really a mock-up. It’s not a full-on production model.

I also thought of it as a graphical engine. A lot of our work is design and graphics driven, which is quite minimalist, boiled down. Ultimately we needed something just to demonstrate the filming process we were working with.
Our goal is to show a bit of a narrative, but also a graphic design piece where you might look at it and wonder, is that a render? Is that a motion graphic, or is that a practical object?
b&a: How did you then set up your shooting space to capture this? Tell me about both the motion control unit and the large format animation camera.
Christopher Webb: I have to give a massive thanks to Graceann Dorse, my business partner who runs this place and helps to make all this possible. She supported this as an R&D investment from the start. Also, Angela Abel, who’s our Head of Camera Department and helped me build all of this setup and run it day after day and program it. Dominick Pietrzak also pitched in with programming on top of being an imaging technical guru and colorist.
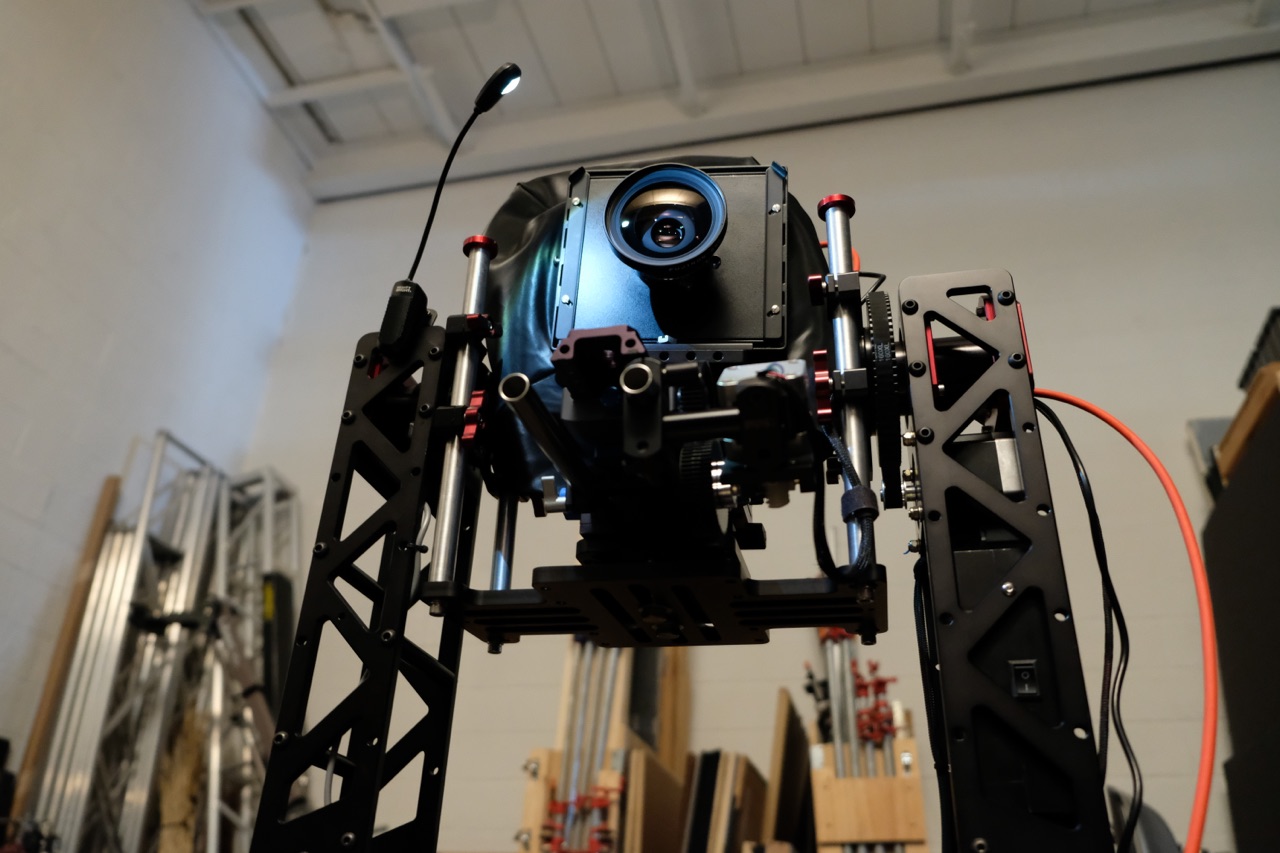
The setup had a 10-foot motion control track on the floor supporting the Voyager on a pedestal so it could move around the space and revolve. The camera was its own project. We spent about a year experimenting with a large format bellows camera with Fuji optics, basically a four by five film camera with a large format lens, which has a massive image area, and we actually motorized it. Where a photographer would have adjusted the lens board and the sensor plane to control perspective or focus, we were abusing those powers by manipulating them live to create really soft, crazy distortion over here and super sharp imagery over there and then moving it during the shot.
Those lenses were also never designed for a cinema environment, so you get all kinds of crazy flare. They’re almost impossible to work with, in some senses but for us, we loved it because everything we would do would create some amazing glow or halo.

The camera itself was also on its own motion track, so it could drive around, and it could focus and shift the bellows. This is all synchronized with motorized lighting and it’s all controlled by Dragonframe, which is stop-motion software gone live-action motion control, gone go-motion, here. Those guys really moved heaven and earth for us. We would call up on a Friday and say, ‘We need this to act in a completely opposite way than you might think, could you please help us out?’ And they would help us figure things out. Maxicrane also lent a hand by custom building motion control heads for us on short notice and providing invaluable technical consultation.
So, in the end, what we had was all this set up in the space moving together over time with a very special projection lighting system coming from the back to create the glow that looks like smoke or volumetric lighting, but it’s actually an optical effect.
b&a: Just with the camera you used, what would a normal camera have captured that’s different? Why did you end up choosing that one?
Christopher Webb: I just really love those cameras. They’re fun to work with. You have so much control. I was looking at optical printers and old effects cameras and how they would function and move. Like the VistaCruiser and the Dykstraflex and the way they would actually focus by moving the lens in and out. So I thought, well, here’s a massive optical effects camera that can do all sorts of stuff, why aren’t we using that?
The Fujinon 90mm that’s on there, which is quite wide, I just physically like it. I like holding the lens. I love the look of it. It’s got this big eyeball and the way that it saw the model with the Fuji medium format back was amazing. We use Fuji GFX-50s and GFX-100s cameras. They are game changers. We can essentially shoot at 11K resolution, every frame of animation is a beautiful photo. That camera setup created a sense of scale that was totally different from any miniature shooting we’ve done in a live-action sense.
b&a: In the film, there’s lots of different types of lighting effects, but we’re generally talking here about light streaks. Can you explain how you actually achieved that?
Christopher Webb: The light streaks themselves are long shutter streaks, so it’s time-lapse or go-motion, effectively. You start with the idea that, if the shutter is open and a car drives by at night, you’ll get a lovely streak from the tail lights. So when you animate all that with motion control, you get beautiful graphical streaks that you can manipulate and give shape to in space, and you can actually have a burn-in which allows you to see the subject.

For each frame, you can set the shutter to hold for a moment with the camera still and then move. You’ll get a registered burn-in of the ship or model with streaks, and you can vary how much ghosting or how much opacity you do or don’t want. We’d also start mixing those axes. It goes from revolving being the primary axis to mixing with a linear motion. That gives you this helix effect that comes out whilst you’re moving the camera.
For the glow, we’re misusing an old front screen projection technique where you would front project onto a special retro reflective surface, not unlike the material on a safety vest. When you optically align with that, you get a really intense glowing kickback reflection as you would see at night with a safety vest. It wants to focus that light back on the axis it came from.

What you’re actually seeing surrounding the ship in the film is a retro reflective screen behind the subject and there’s a backlight up over the top that’s out of frame just striking the back of the subject with hard light, which is then bouncing off the back of it and hitting that screen. The screen tries to focus it back like a halo around where it came from. You get this clinging atmospheric glow that also animates with the subject.
This is why I chose to make the model black and white. As it moves, it’s kicking back different light values, and you’ll actually see that it’s a warm tone light raking along the ship as it’s in motion. This is that backlight being animated, a frame at a time, to travel the length of the model. This is also how we created the eclipse effect with just practical black disks.
b&a: There’s another light effect in the film which is the many columns of light. How was that achieved?
Christopher Webb: This is actually what started it all. They are not really physical columns. They are forced perspective streaks with scanimation. That was the first thing we did down this path with the simplest technology. We were working on a different project with a friend, and they left behind a piece of hardware store pegboard that you’d hang your tools on in the garage. It was just there in the space propped up against the wall.

I had a metal stick with LED ribbon on it leaning against the back of the pegboard as I was putting equipment away. I walked by the pegboard and I noticed this flashing strip of light even though nothing was in motion. It was purely scanimation, like a kid’s book or a magic trick where you pull the black and white slides and the cheetah runs kind-of-thing.
The LED heads on the stick were lining up with the holes in the pegboard at intervals. When you walked by, your eyeball was changing its optical axis. I saw this and I thought, ‘That’s free money. What do we do with that?’
We ended up putting the stick behind the board on a revolving time-lapse motor, putting the whole pegboard on a dolly track, and had that moving across the floor in front of the light ribbon. As it moves, you get this free sequential animation and if you revolve it, you get even more. Then we had the camera on a perpendicular track and it would open the shutter and drive backwards and close the shutter and reset. It was in some ways similar to Trumbull’s COMPSY slitscan rig. I just thought, ‘Well, if Douglas and team could do such amazing work with clockwork motors and old targeting computers, what could I do with some digital time-lapse controllers?’
That big rotating shot took nine hours to capture. It got to be about 10 o’clock at night. The thing was rotating in tiny steps and I thought, ‘Oh man, is that center LED going to go right in the middle of the board and flash at the end?’ I had no guarantee that it would do that. I was just hoping it would. And sure enough, right when it hit horizontal, it went through and flashed perfectly across the shot. That really set me off. That’s when Angela and Dominick and the rest really got involved and Graceann started setting this up with me for actual shoots where we could focus on it as a crew because we saw so much potential there.
b&a: In one of your behind the scenes videos for that light scan effect, there are little gauges that are in frame. What are those used for?
Christopher Webb: That is a machinist’s dial gauge. If you were machining something on a mill, like a bit of metal, you could use that to measure, in 10 thousandths of an inch increments, a distance, or to make sure a surface is smooth and true. I used it to manually guarantee that the camera was hitting the right spot on the track each time it reset.
With all of this stuff, with the streak photography, with the moving lights, all of these things in the film, you’re asking a lot of the rigging because it’s not just a stop-motion rig that moves forward incrementally, and if it’s irregular, you are going to feel it. You’re asking it to move forward with a streak and then reset just a little bit further on and then move forward and then reset and so on. So there’s plenty of opportunity for error. That gauge let me check quality way beyond the accuracy I needed optically because if it didn’t match, the whole shot would start jumping around.
b&a: Okay, so you’ve acquired this imagery, you’re getting excited about what you see. Now, obviously this is a demo, but it also becomes a bit of a short film. How did you piece it together to make it into something coherent?
Christopher Webb: Jessica Schoen edited this with me. We have an amazing shorthand. At first, I was really worried about what would go together. I thought, ‘Do I want these light scan things in here or these eclipse moments in here?’ I just sent her the Voyager clips and tried to get her to make something of that, and it didn’t work. There wasn’t enough material or enough scale change.

We came back much later and started throwing these eclipse pieces in and the light scan pieces, and then Dominick graded them to match and to compliment each other. We went for a warm and cool contrast between the different story beats. Jessica then made all of that into what it is.
Our friend Dan Pierse also did some post clean-up on the eclipses where there were little dust specs right on the highlight edge that were just killing me. The disks became dust magnets during the shoot because of the heat in the air from the light. In hindsight I could have put a little fan across there to push away any dust because the exposures were so long.
b&a: I guess that’s an interesting point because that’s where digital techniques can help you, but I also like that the whole film captures and retains many imperfections.
Christopher Webb: Yes, absolutely. Things like, the texture that’s on the black parts of the model which absorbs and reflects light in an organic way. We got all this ‘weird’ free optical interaction. There’s also surfaces that are flat to camera versus perpendicular on the sculpture which start interacting with each other in the animation.

There’s even some ridging, which is an imperfection that Trumbull and people long after him would try to fight where you’ll get these little steps in the light streak. I was very impressed honestly with how Dragonframe handled that, and the rigging handled that because most of it’s perfectly smooth and glassy.
At one moment in the helix shot you see ridging and then the ridging stretches out and it’s almost like it’s moving through liquid light or something. I thought, ‘That’s terrible.’ But everyone else was like, that’s amazing. How would you do that if you wanted to? So then I started to love it. There were a lot of happy accidents which we love to embrace. That sense of discovery is what keeps me coming back to practical effects as my starting place for inspiration.









“The LED heads on the stick were lining up with the holes in the pegboard at intervals. When you walked by, your eyeball was changing its optical axis. I saw this and I thought, ‘That’s free money. What do we do with that?’”
I absolutely love that.
Fantastic film, and a really great article- packed with thought provoking inspiration.
Brilliant work, all around.
It’s so cool, isn’t it!
Thank you Ian and Befores & Afters for covering all types of VFX work so well. We are all so lucky to have a place to share, learn, and inspire!
Thank you Marc. I know you’ve been there when this kind of thing happens and the Magic is REAL. Hope we get to collaborate one way or another!
Thank you Marc! I know you have been there when the magic appears right before your eyes.