Plus, a look at the studio’s canyon creation for that dramatic opening scene of the series.
The Falcon and the Winter Soldier’s first episode features a dramatic canyon sequence over Tunisia involving Falcon (Anthony Mackie), a stolen U.S. Air Force plane and wing-suited flyers.
Working under production visual effects supervisor Eric Leven, Weta Digital, led by VFX supervisor Charlie Tait, combined live-action bluescreen photography of Mackie on wires, wing-suit flying elements and other plates, with extensive digital environments, CG vehicles and CG characters (often mixing and matching the digi-doubles with their live-action counterparts).
Tait explains for befores & afters how this was achieved.
b&a: For the canyon itself, was that something that you considered could be a place you could actually go and shoot, or get photogrammetry reference for? How did you actually approach building the environment?
Charlie Tait: We certainly did consider the drone work, but of course we couldn’t really travel. I certainly would have loved to have gone to a canyon and done some drone shooting. But in the end, to be honest, it really wasn’t necessary, and the method we came up with, it provided that realistic result, but it was pretty efficient, I think.


We started with a terrain model from satellite data and height maps of Pariah Canyon in Death Valley. And the reason that was a good thing to do was that we had that sort of natural, organic fractal layout. It’s a real canyon, it has a narrow, tight end, and it widens up and opens at the other end. And it has all of its cracks and tributaries, doing the right thing and looking natural.
So we used that essentially for our layout, and we then moved into a much wider desert from a different height map actually. So we had our terrain model where we wanted, and these are high-ish res. They’re kind of high-res, but they’re not high enough res to fly inside. The problem with height maps, of course, is that there’s no detail on the vertical surfaces. You’ve either got high or low, and there’s nothing on those steep parts.
A lot of the time when you’re in the canyon, you’re flying along, looking at those walls, and there’s really nothing there, in terms of detail. So we textured and shaded the canyon model that we made from the height map. This means we had something that looked pretty good, and this worked from very high altitude. It would look good from very high altitude from the aeroplane height, but then when we got into it—we used the same model in previs—we were able to scope out where they would put cameras and create shots, using this model. And then what we did is we had a kit set of loads of rocky parts. A lot of them were like biscuits, piled up to make columns, and then you’d jam columns together to make walls.


It was fairly straightforward to do, but the thing that really made it work and gave it that high level of geometric detail, was the fact that we did it every single time to shot. Each shot is its own model, or if you like, a redressing of the height map model, using these bits of geometry.
So, you’d see what you see and then you’d put in all these pieces, and you’d follow the contour of the smooth walls, adding in all these pieces with the extra detail. Following the contour would mean that you’re maintaining that realistic form and structure in which you’ve staged the action in previs. So you’ve got the action where you want it, you’ve got a structure that’s natural, and then you’re adding the detail by adding all those pieces of geo. It was beautiful. It worked so well.
b&a: There’s a really nice combination in this sequence of what could be achieved bluescreen photography, wire work, and then obviously any kind of digital augmentation or addition. How do you decide what was going to work on each shot?
Charlie Tait: Well, when they shot the bluescreen, they want these facial shots acted out. They needed him flying and needed close-ups on him. So they had to shoot it somehow. And obviously, hanging him on wires in front of a bluescreen makes a lot of sense. It’s going to help to get the cameras doing what you want, and to have that sense of flying. But there were a few things that weren’t ideal for us with that material when we started. Unfortunately it was very overcast when they shot it. They shot it outside. And in some of it, it was even raining. You could see spots of rain on him.


Now, when they had shot the stunt guys in wingsuits, there was a lot of stuff they actually shot in-camera. There was a real ‘GoPro’ style that goes with that. There’s tonnes of it on YouTube, all these people with these action cameras, doing these crazy things. Everybody knows what that looks like, a helmet cam, looking back at the guy flying.
Well, the way that that stuff looks, it has a very wide lens. And that means that everything is very sharp. But that’s not how it looked in the material that we got, because it was shot a little bit more like a portrait. Perhaps the lenses were too long, perhaps it was because there wasn’t enough light. But the back of him, like his feet—if you’re looking at his head and he’s flying towards camera—his feet and his hands often would be out of focus. Only his face would be sharp.
That might’ve looked alright at the time, but unfortunately for us, that would mean, if we composite that with our environment, it’s all out of focus behind him. And that just doesn’t make for a good-looking shot. Also, we wanted more of that GoPro style.
So, the way we attacked this was to line up our digi-double very accurately, including to the face. So the face is a really spot on match. And then we’re able to render him without that de-focus. So his face is still his face, but the rest of his body is our digi-double. And that allowed us to have him sharp all the way back in the background shot. Then we did some sort of quite extreme fish-eye looks. We stabilized it all a little, so it looked more like a helmet camera pointing at his face.
The big bonus that we got by doing that was that we were able to re-light him. This meant it would appear, when he turns, that his relationship to the sun was changing. And you could see the lights rotate around him, which really, really helps to bring it all together. And of course, that wouldn’t really have been possible with him on wires in an overcast situation.
It meant that there was quite a lot of process in those shots. From the bluescreen that they shot, we’d be extracting the head, we’d be changing the camera, we’d be rendering all CG, including his head, of course. And then we’d remove the sense of light that was there in the plate photography. We flattened him off so he had a little more of an albedo. We tried to basically knock back the spec, and then we’d renderer our guy and extract the spec from him and the sense of the keylight, and add that back onto the plate guy. What you’re looking at in every one of those is lighting from a CG head on top of the plate head. So, it looks more like him actually than our digi-double would’ve looked on its own, and you’ve got his performance. And it’s photoreal, but we’re just adding that sense of light that puts him in the scene better.
b&a: There’s this one shot where he approaches the cockpit of the air force plane. Can you talk about how that shot was constructed?
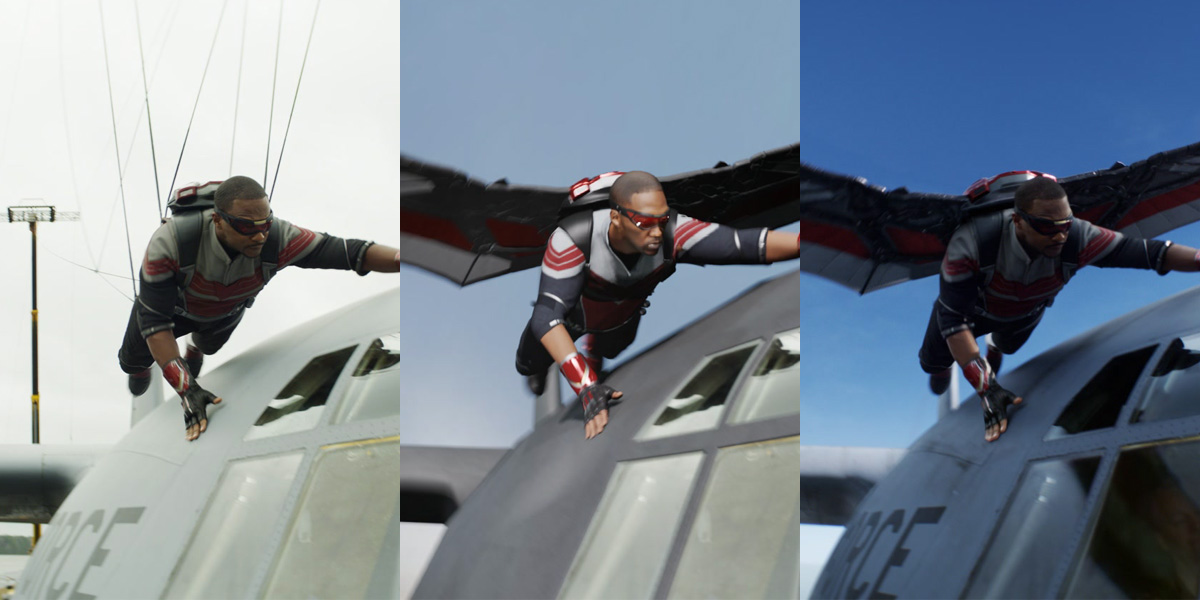
Charlie Tait: That was one of the hardest shots for sure. It was really, really hard. The aircraft they shot was at an air force base. It was very overcast. It was raining as well, some of the time. And they had a really enormous wire rig to fly him in towards the plane, but we needed him to fly from further away. We did a digi-double handover, so he could start further away. And he transitions into the live action guy, actually quite late, when he gets really close to the cockpit.


For the aircraft, we had to build the aircraft for other shots anyway, as a CG asset. It was built from that live-action one, because that was what was shot. So it was pretty, pretty damn accurate match. The aircraft that you see, of course, in the photography, the props weren’t spinning, it’s just sitting on the ground. So part of the nose of the aircraft is still what they shot. But in that case, it’s still a little bit of a 50/50, CG and plate. And then from where he lands from about his feet back, the whole fuselage and the wings and everything, that’s all CG.
We did the same re-lighting trick, because it was very overcast. As he comes in, when he’s in the far background, he’s lit with the hard key, the hard single source sunlight that we wanted. And as he transitioned into the live action chap, he looked more flat, so we did the same re-lighting.
Our digi-double actually matches his position all the way through the shot, so that we can extract the lighting from the CG guy and apply it to the plate guy, to give it that more contrast-y look. The plate—which you can see in the breakdown—is really, really flat. And right through the sequence, we went with a very hard key, dark fill side, bright key side. That was a big shot, a complicated shot.
I don’t think anybody would have picked that that’s a digi-double handover. So what’s nice about that is it really looks like he must be flying, because we see him small in frame, and then we see him right up in front of camera, and it’s clearly Anthony Mackie.

