An iconic effect by ILM and an iconic effect in VFX history.
The final airport pullback shot in Die Hard 2 by Industrial Light & Magic is often touted as the first time that digitally composited live-action footage was used with a traditional matte painting.
I’ve always been enamoured by that shot, partly because of its history in VFX and also because you can still see the original enormous matte painting – thirteen feet wide and five feet tall – by matte artist Yusei Uesugi hanging up at ILM’s San Francisco office.
On the 30th anniversary of Renny Harlin’s film, I thought I’d ask Bruce Walters, who was ILM’s matte department supervisor at the time, about how the shot came to be. He runs befores & afters through the making of the 35 second scene, from the physical painting itself, capturing it on film, to the use of then-new Photoshop (and, of course, having Photoshop co-creator John Knoll on hand for advice), plus the tricky task of navigating the output of the shot to final negative.

The origins of the shot
Bruce Walters: They wanted this airport pullback shot for the end of the movie. When they first started talking about it, we said, ‘Why don’t you just go to the airport and shoot some planes?’ But, if I’ve got the numbers, right, it was going to cost $40,000 a night for each plane just to park it there. Plus the crew, the lights, the permit – you can imagine it would cost $250,000 or more to shoot these airplanes. So they decided it should be a matte painting. We had done a kind of nested technique with the opening zoom in shot for 1989’s The Burbs (read about how that shot was done here). We thought we could do it digitally on Die Hard 2.
Could we do it digitally?
One day, John Knoll came in – he’d been working in the camera department – and he said, ‘I have this idea for a program where you can manipulate images with channels.’ None of us knew what the heck he was talking about. He’d start showing us things as he and his brother were developing it; Photoshop. And we were able to get hold of one of the first color Macintoshes and start using it.
A bit later, the company was still centered around big Silicon Graphics machines, but we also had a bunch of Macs, and we weren’t really allowed to tell anybody we were using them; that became the Rebel Mac Unit.
Anyway, for the Die Hard 2 matte painting, the computer we were using only had an 80 or 160MB hard drive. That was it. It couldn’t even hold one digital painting. You needed a whole bunch of disk drives just to do that. So, Yusei decided that he could paint it for real and then we could photograph it in parts and do the blends and color fixes digitally in Photoshop.
The painting process
An airplane is actually one of the hardest things to paint, and Yusei had to paint it big. If you’re doing mountains or something similar there are all kinds of techniques for that, but an airplane isn’t as forgiving, plus it had graphics on the side. Actually, that was another reason why we didn’t use real planes since they all had to have made-up names on them because we couldn’t use names of real airlines.
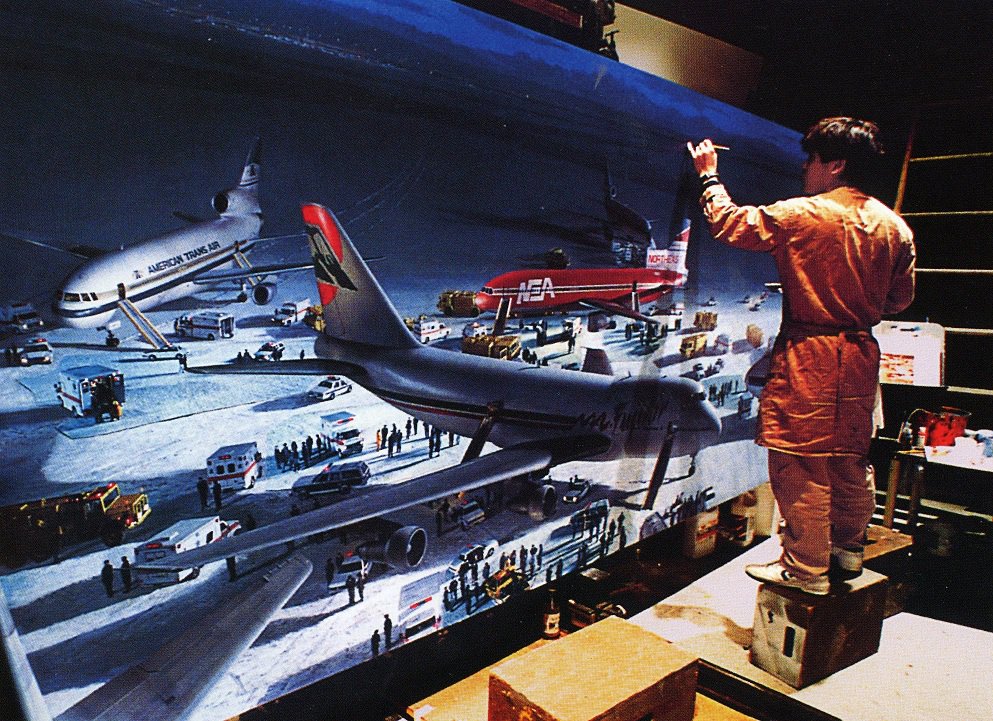
To help with the painting, which took Yusei five weeks, Paul Huston built some scale models of the planes and then arranged them in the way you see them in the shot, then lit them and shot them so that Yusei would have good reference to work from. That was critical because, as you can imagine, you’d never get a photograph of an airplane at exactly the right angle.
There are live-action people in the background, and we had to shoot those. They had to be shot in a particular way so that they fit in perspective; Yusei supervised that and later composited those in there.
Yusei also had to figure out that if you take the area where the live-action plate is, what’s the smallest area he could paint and still have it match the plate? That’s what determined the size of the painting; you just go up from there. I think the actual middle of the painting where the pull-back starts from was 12 inches wide. So he needed to paint 12 inches wide in lots of detail so that it would match the plate. Then as we zoomed back he’d paint with less detail.
We used our Automatte camera to shoot the matte painting in five telescoping 4K sections. It was always shot at the same resolution, shooting different parts of it from the center out. That was brought into Photoshop, where Yusei blended it altogether. The sections were digitally nested into each other, and composited and scaled at output resolution, which was a little less than 2K.
Getting it back onto film
At the time, we only had two ways of outputting the final negative. One way was on a machine ILM was just developing with Kodak in the optical department, but it only did 4-perf. The other way was, in the computer graphics department, where they had a laser scanner, and it could do VistaVision. However, it had a failure rate of one frame every so many frames, let’s say every 1500 frames. And the shot was longer than that.

So what could we do? If we shoot it on 4-perf on a machine that we knew would work, it was only going to be 4-perf resolution. That meant we couldn’t do any optical compositing with it or it would degrade the shot. So no titles over it, no fades, no nothing – it just had to be cut-to-cut.
Or we could try it on the laser scanner. And that way we’d get a VistaVision image, but we didn’t know if we could make it all the way through the shot. And we only had a certain amount of time. The decision was, we’ll do it on both at the same time. Also, we told the director, you can’t put your name on it because that’ll ruin the shot or degrade it.
Well, you know what happened…the laser scanner didn’t get it done. The 4-perf got it done, and the director put his name on the shot! We were kind of disappointed because this made it a flatter shot.
The shot’s legacy
That was really a major moment for us. And then The Young Indiana Jones Chronicles was when we started doing digital matte painting in a big way, but there were lots of other digital things all happening around that time, of course.
I’m really glad to be asked about the Die Hard 2 painting. I think when people see it in the hallway at ILM, maybe they don’t know quite what the story is with it, because it’s always touted as being a digital matte painting, but it’s ‘painted’, so, you know, what’s going on with it? I’m excited to have been part of the process.








The explanation for why it turned out kind of flat is nice to finally get. For years, I thought it was just me thinking this was one of those ‘too many notes’ matte shots, because it just never worked for me, not in theater or laserdisc or other.
I still really like the movie a lot; I think the complications/reversals with the John Amos character really plus the thing up a lot, and I have to say that the filmmaking manages to skate over some massive continuity issues (McClane covers a LOT of territory during every cutaway to his wife in the plane.) And the shot-outdoors model stuff is really excellent, ILM was doing really nice in-camera work back then with this and ALWAYS.
So many ILM shots during the “Kerner” era used willing employees from ILM and LucasArts Games. That was a magical time with us all huddled together down there in the early 90s. Thanks for the article!
Awesome! I love this kind of stuff and have a small collection of older Cinemax magazines, they are so inspirational. Would love to have these skills and to have been able to work on stuff like this. Thanks for sharing.
Sorry, should read Cinefx magazines (damn autocorrect)
Lets a have a Final pull back matte shot shootout! This one or the Raiders one? 😀